Add a New Graphic Using MyGraphics™ Designer
NOTE: You perform this procedure on a PC separate from your mailing system using MyGraphics™ Designer.
Make sure you have reviewed and are familiar with the Prerequisites for Using MyGraphics™ Designer.
To run MyGraphics™ Designer:
- From your PC, go to www.pb.com. Select My Account.
- Enter your username and password, then select Log in. As soon as you log on, a "Connect+ Anywhere" pop-up box displays. Close this pop-up.
- Select MyGraphics™ Designer link on the Account page. This is located in the "Connect+ Anywhere" list box on the left side of the Account page.
- All of your mailing systems are displayed. Each one is identified by its base number (PCN) and serial number. The base number and serial number are located on a label placed on the feeder module on your machine, just to the right and under the display.
- Select the checkbox in front of the unit(s) you want to contain the new graphic. To select all units, select the checkbox "Select All". Select Next.
- Read the "Terms of Use" and select the check box for "I agree to the terms and conditions". You must agree to the terms in order to upload the new graphic.
- Select the Start creating new My Graphics button.
- Select the option button for the graphic type (Text only, or Image + Text). Select Browse to import an image.
-
Select an image file from your PC. You can also select from a gallery of images provided by MyGraphics Designer.
NOTE: The graphic or image (monochrome or color) file must be in one these formats: BMP, JPG, GIF, or PNG. Each file can be up to 12Mbytes. GIF and PNG graphics that contain transparency characters are not supported in MyGraphics. These characters may display in an unpredictable manner, for example, the transparency character may appear as black.
- Enter a unique name (up to 20 characters) for your new graphic. Use only: a-z, A-Z, 0-9, '-' (dash), '_' (underscore) or ' ' (Blank Space).
-
Select the desired graphic size. A graphic can be 0.5 to 6.0 inches in length. The maximum height is 7/8 inch.
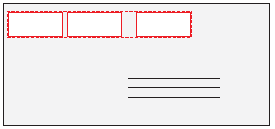
Some of the possible locations for your graphics are shown here:
- The image loads in a pallet. You can add text to the image, resize or rotate the image, or add a border. For more information, refer to How to Create a New Custom Graphic. When complete, select Next.
- A preview of the customized graphic appears. You can select to upload it or return to the canvas and make other change.
-
Select the Upload now button when you are done modifying the image. To create another graphic select Create another graphic.
NOTE: It may take several minutes for the graphic to be ready for downloading. The image will remain on the MyGraphics™ Designer server for a maximum of 21 days. After that it is deleted. Once it's uploaded to your Connect+™ Series it remains there until or unless you delete it.
- For status of pending uploads or the history of all the graphic images, select the Status & History tab. Refer to Check Status of Graphic Images for more information.
- Once you are finished, select the SIGN OUT button.
To load new custom graphics onto you machine, refer to Check for Rates and Software Updates.
To add the new graphic to an envelope, refer to Change or Add a Graphic Ad to a Mailpiece.
Back to top